


Recording guide for all video performances
For the exam to be valid, there are some rules listed below that you need to observe.
Who may supervise?
The exam must be recorded under the supervision of an adult. The supervisor can be:
- a parent
- the teacher
- another person as long as they are over 18.
The supervisor is there to ensure that the video is recorded in one continuous take, and that no teaching or coaching occurs during the exam. The supervisor’s name and phone number must be provided on the video submission form in case the video needs to be verified later.
Who can submit the video exam recording?
The enroller completes the entire process. The enroller could be either the teacher, parent or another enrolling adult.
All AMEB video exam recordings must be submitted via AMEB Connect ONLY.
Please note:
- Any recordings using the front facing camera will give a mirror image and a recording with mirror imaging will not be accepted. Should a video exam link be submitted that has a mirror image, the result will be "Unable to Assess". You must watch the recording once you have finished to ensure it isn't mirror image.
- Candidates are permitted to use a page turner for their performance. Page turners must ensure their presence is as unobtrusive as possible for the exam recording. The page turner cannot obstruct the view of the candidate’s hands or pedal work in the video recording. Page turners are not to verbally communicate with the candidate, or coach the candidate in any way during the performance. If there is any evidence of coaching, the result will be “Unable to Assess”.
- The video recording should be one continuous take with minimal gaps between each work, and must be one video file.
- If the video submitted is found to be edited, the result will be "Unable to Assess"
Recording and introducing the candidate
- The video repertoire exam recording should be recorded no earlier than three (3) weeks prior to enrolment and can be submitted up to three (3) weeks from the date of enrolment.
- Candidates should announce the date of the exam at the beginning of the recording (including the year) OR if the device you are using to record the video exam has a setting that allows you to include the date of the recording, you can turn that setting on. Either option is acceptable.
- When the candidate (and accompanist, if required) are ready to commence the examination performance, the recording should commence with the candidate introducing him/herself using the official name listed on the candidate record, stating the date, what exam they are enrolled in and the title of their first piece they will be performing:
e.g. “My name is Jane Smith, and the date is 18 September 2025. I will be doing my grade 2 piano video repertoire exam and my first piece is xxxxxx.”
Stating the above details before you perform your first piece will help ensure the examiner is watching the correct video for the candidate. The candidate can read this information off a script if need be, and for younger candidates (8 years old or under) the supervisor can announce the candidate introduction for them.
- Proceed with the presentation as if performing for an examiner situated in the same room.
- Announce each subsequent work. E.g. “I will now play xxxxxx.”
- The candidate should speak at the end of their final item. E.g. "That concludes my program. Thank you for listening."
Camera, microphone and video file size
- A high-quality recording device should be used, ie a recent model smart phone (using the back camera) or tablet might be suitable. Whatever device you choose to use to record your video exam, please ensure you test it first for both audio and visual quality.
- Video resolution of 720p is recommended (minimum 480p).
- It is important that the sound is appropriately balanced between the solo part and the live or recorded accompaniment (if any).
- Exam conditions are expected so please choose a quiet location with good lighting and minimal ambient noise.
- Ensure your video file size is no bigger than 1.5GB in size. Files larger than this are unlikely to successfully upload. If the resolution is too high and the video size too large, you will need to compress the videos according to Vimeo guidelines to reduce the file size before uploading.
- Before uploading, ensure the file name contains no 'special characters' - only letters and numbers. Files that contain special characters may not upload. We recommend that you change the file name to the candidate name followed by their candidate number. For example: JohnDoe45678.mov or JaneDoe34567.mp4
Accepted video file format types
AMEB Connect will accept any of the following video file format types:
- .MP4
- .MOV
- .WMB
- .AVI
- .FLV
Most mobile phone, tablets, laptops or computers are covered by the above accepted format types.
To determine what video file format type your device creates, go to a video on your device and click on 'info' or 'settings' and the information will display the format type. Alternatively, you can also email yourself a copy of the video recording file, and the video file attachment in that email will display the format type (eg. the attachment will say videofilename.mp4 or videofilename.mov).
Please note - if you are using a device that has a different format type to any of the ones listed above, the upload process in AMEB Connect will fail.
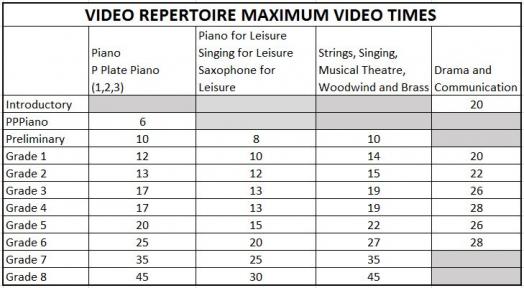
How long should my video be?
- The program of work must be chosen with reference to the current year's syllabus.
- The number of works and the duration of the recording must not exceed the maximum performance time listed in the Repertoire Exam section of the current year's syllabus, or on the AMEB (NSW) website for Leisure Repertoire exams for the particular instrument and grade.
When uploading to AMEB Connect
When the enroller is uploading the video file and repertoire list to AMEB Connect, they may find that if the video file is large and/or your internet is slow and the upload fails, it is likely you can be logged out after 10 minutes of inactivity, so please try the following:
- try uploading when internet upload speeds are faster (no-peak periods), as these can vary significantly depending on the time of day and your internet plan.
- make sure you stay on the video submission screen during the upload process and do not navigate away (nor walk away from your computer), and
- click something on the screen during the upload process to ensure you remain 'active' otherwise, you may be logged after 10 minutes of inactivity.
Should you have any issues during the upload process please contact the AMEB NSW office.
Summary Checklist
For your video to be assessable and submitted correctly, please ensure:
- the candidate clearly states their name, date (including year), subject and grade at the start of the video.
- the entire video has been recorded in one continuous take from the beginning to the end of the last piece (have only one video recording).
- you have checked the syllabus requirements for Repertoire Exams.
- the enroller has checked the quality and completeness of the video before uploading to AMEB Connect.
- the examiner is able to see the candidate as clearly as they could in a face-to-face studio environment.
- the candidate's entire head and also full body (where possible) are visible throughout entire video.
- suitable angle that shows both hands (all fingers clearly visible on instrument) and feet/pedals (piano).
- the video is NOT in mirror image (not recorded using the selfie camera as this can reverse the image).
- live piano accompanist is at least partially visible in frame.
- AMEB Connect is the ONLY way to submit your music and/or drama and communication video for examination.
Guide for specific instruments
The following instructions were provided by the NSW Chief Examiners on the best way for you to set up your environment for a video performance.
Piano Exams
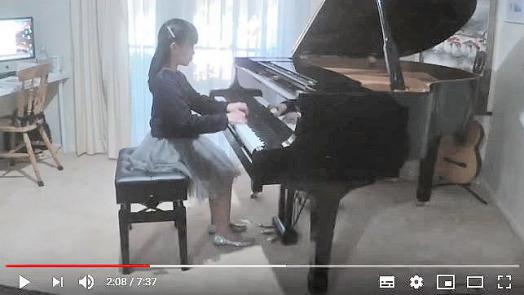
- The video should be filmed side-on, preferably from the right hand side, showing a view of the entire keyboard. Film from a slightly elevated perspective so all ten fingers can be seen playing the keys. It is not necessary for the entire piano to be on screen.
- Both of the candidate’s hands, arms and the upper body must be clearly visible at all times.
- Where possible, the video should show the pedals, especially in Level 2 exams (Grade 5 – Grade 8).
Prepare for a P Plate Piano Video Exam in accordance with the guidelines.
- A teacher, parent or sibling may present one of the three pieces as a duet with the candidate.
- A teacher, parent or older sibling sets up the recording equipment.
- At the beginning of the recording, the candidate introduces him/herself.
- The candidate or the supervisor/parent should announce each piece, before playing it.
- The supervisor/parent may wish to play the examiner role and (very briefly) ask the candidate what they like about each piece
- A report and certificate will be mailed to the enrolling person after the examiner has reviewed the video recording.
- On completing P Plate Piano Book 3 Video exam the candidate will be awarded their personally named P Plate Piano ‘licence’ card.
Strings Exams
The ideal video setup for upper strings (Violin and Viola) is as follows:
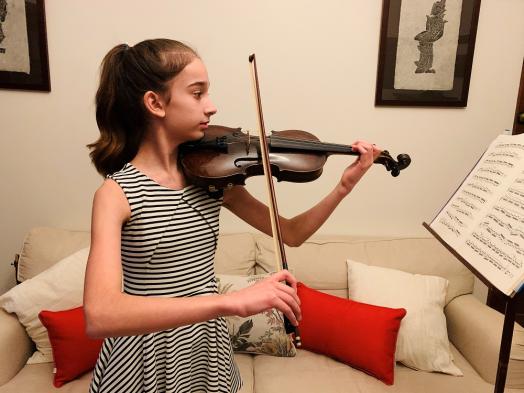
- The candidate should stand side-on to the camera. Ensure the whole instrument is visible at all times.
- The candidate’s body from at least the waist up must be visible at all times.
- The entire bow arm, the angle of the bow to the bridge and the hand must be clearly visible.
- The music stand must not obscure the view of the candidate or instrument (and accompanist if applicable), and should be positioned slightly to the side of the screen.
- If the candidate is playing with live accompaniment, the accompanist should be in full view to demonstrate the interaction between the performers, especially in Level 2 exams (Grade 5 – Grade 8).
The ideal video setup for lower strings (Cello and Double Bass) is as follows:
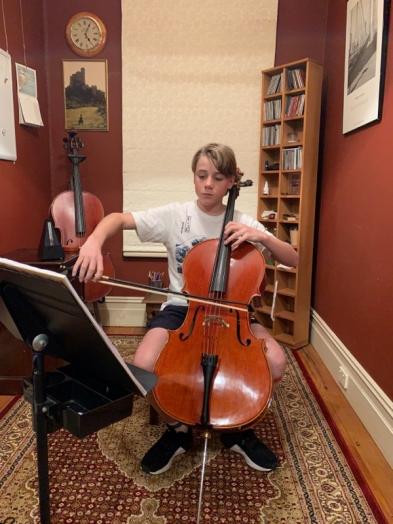
- The candidate must be positioned facing the camera.
- The candidate's whole body and instrument must be visible at all times.
- The music stand must not obscure the view of the candidate or instrument (and accompanist if applicable), and should be positioned slightly to one side.
- If the candidate is playing with live accompaniment, the accompanist should be in full view to demonstrate the interaction between the performers, especially in Level 2 exams (Grade 5 – Grade 8).
Woodwind
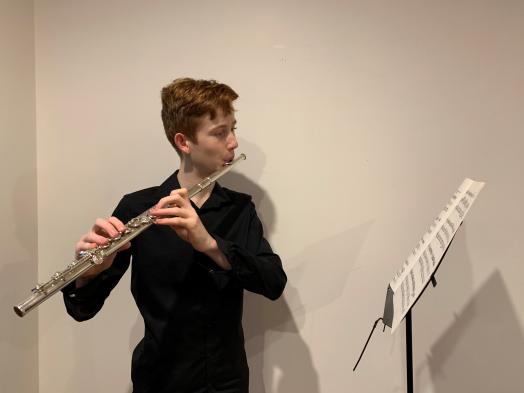
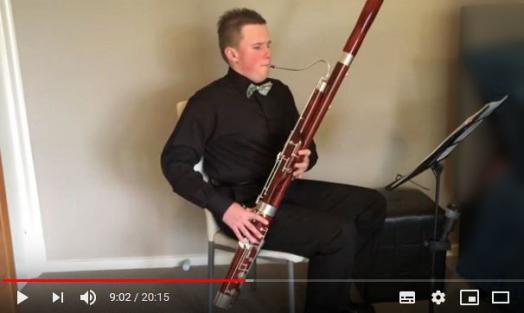
- The candidate should position themselves at an angle to the camera (not more than 45 degrees). The whole instrument must be visible at all times.
- Where possible, the candidate must be in full view from head to feet at all times.
- The music stand must not obscure the view of the candidate or instrument (and accompanist if applicable), and should be positioned slightly to one side.
- If the candidate is playing with live accompaniment, the accompanist should be in full view to demonstrate the interaction between the performers, especially in Level 2 exams (Grade 5 – Grade 8).
Brass
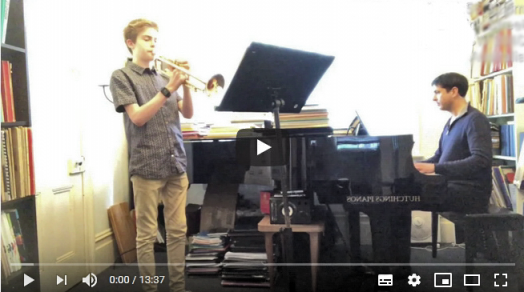
- The candidate should position themselves at an angle to the camera (not more than 45 degrees). The whole instrument must be visible at all times.
- Where possible, the candidate must be in full view from head to feet at all times.
- The music stand must not obscure the view of the candidate or instrument (and accompanist if applicable), and should be positioned slightly to one side.
- If the candidate is playing with live accompaniment, the accompanist should be in full view to demonstrate the interaction between the performers, especially in Level 2 exams (Grade 5 – Grade 8).
Voice and Musical Theatre
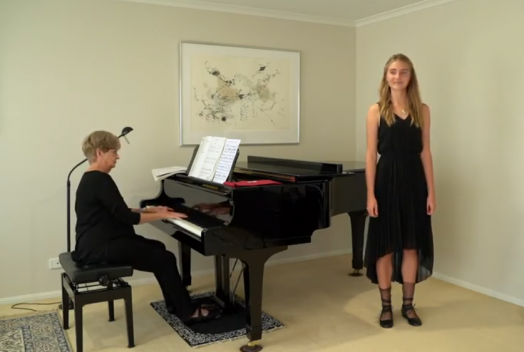
- The candidate must be in full view from head to feet and facing the camera front-on or at a slight angle to one side.
- There should be an allowance made for some space to move when delivering an operatic aria or musical theatre song that may require it.
- The music stand must not obscure the view of the candidate (and accompanist if applicable), and should be positioned slightly to one side.
- If the candidate is singing with live accompaniment, the accompanist should be in full view to demonstrate the interaction between the performers, especially in Level 2 exams (Grade 5 – Grade 8).
Drama and Communication
- The candidate must be in full view from head to feet.
- There should be space allowed for the candidate to move in the stage area during the performance and to use different levels and props as appropriate.
NEXT:

> Requirements
> Exam preparation
> Enrolment process
> Recording your video
> Uploading & submitting your video
> Exam viewing and results
> Enquiries
> FAQs
> Music Video exam submission form
> Drama and Communication Video exam submission form